
Thanks. I managed to go for a sail in heavy air a couple of weeks ago. The new rudder is definitely an improvement in terms of balance.
- Welcome to Ariel & Commander Owners.
Ariel & Commander Owners
This section allows you to view all posts made by this member. Note that you can only see posts made in areas you currently have access to.
#2
Gallery / C-025 Bisquit
July 09, 2022, 07:08:48 PM
Kyle,
Sorry I didn't reply sooner. Got really busy. I reused the metal from the old rudder so there's nothing left.
Sorry I didn't reply sooner. Got really busy. I reused the metal from the old rudder so there's nothing left.
#3
Technical / Course Correction
May 15, 2022, 07:34:34 PM
Course Correction
I decided to make a new rudder. The old rudder was perfectly fine however, the aperture was too small for the feathering prop I wanted to install. Also, I felt too much correction with the rudder was necessary in moderate to heavy air. I hate to mess with the original Alberg design. It is elegant and compliments the lines of the boat perfectly. However, I suspect my boat may have been delivered with a taller than standard rig. (Perhaps it was a Great Lakes – light air modification.) My P measurement is 1′ longer than than standard. Seat of the pants engineering led me to decide I needed to add 15% additional surface area on the trailing edge to help with the increased main sail area.
Initially I planned to open up the aperture and scarf some wood to the trailing edge but this started to look too hacked together.
Abandoned Modification
Back to the drawing board. remove the original bronze shafts and build a new rudder. Luckily I happened across a 6/4 x 24″ mahogany board that would allow a one piece replacement. It is a testament to the quality of the bronze that Pearson used that, after almost 60 years, when I removed the nut access windows, the bronze tie rods unscrewed like they were assembles yesterday. Once removed, I used an induction heater to heat up the upper shaft and bend it back 30 degrees to allow for the larger aperture.
Next step is to make a template for the new rudder. I installed the new prop then made a Masonite blank and experimented with shapes that cleared the new prop, had the additional surface area, and looked like they belonged to this classic design.
Once I decided on a shape I cut the plank to the new shape, ran the leading edge through a router with a 1″ rounding bit to accept the upper and lower shafts, drilled holes for the tie rods, then using a 1 1/2″ hole saw made windows for the new nuts.
New rudder faired with nut windows filled.
Next step is to install, coat with epoxy barrier coat and bottom paint.
On the boat
Barrier Coated with IP 2000 E
Bottom Painted and ready to go
I decided to make a new rudder. The old rudder was perfectly fine however, the aperture was too small for the feathering prop I wanted to install. Also, I felt too much correction with the rudder was necessary in moderate to heavy air. I hate to mess with the original Alberg design. It is elegant and compliments the lines of the boat perfectly. However, I suspect my boat may have been delivered with a taller than standard rig. (Perhaps it was a Great Lakes – light air modification.) My P measurement is 1′ longer than than standard. Seat of the pants engineering led me to decide I needed to add 15% additional surface area on the trailing edge to help with the increased main sail area.
Initially I planned to open up the aperture and scarf some wood to the trailing edge but this started to look too hacked together.
Abandoned Modification
Back to the drawing board. remove the original bronze shafts and build a new rudder. Luckily I happened across a 6/4 x 24″ mahogany board that would allow a one piece replacement. It is a testament to the quality of the bronze that Pearson used that, after almost 60 years, when I removed the nut access windows, the bronze tie rods unscrewed like they were assembles yesterday. Once removed, I used an induction heater to heat up the upper shaft and bend it back 30 degrees to allow for the larger aperture.
Next step is to make a template for the new rudder. I installed the new prop then made a Masonite blank and experimented with shapes that cleared the new prop, had the additional surface area, and looked like they belonged to this classic design.
Once I decided on a shape I cut the plank to the new shape, ran the leading edge through a router with a 1″ rounding bit to accept the upper and lower shafts, drilled holes for the tie rods, then using a 1 1/2″ hole saw made windows for the new nuts.
New rudder faired with nut windows filled.
Next step is to install, coat with epoxy barrier coat and bottom paint.
On the boat
Barrier Coated with IP 2000 E
Bottom Painted and ready to go
#4
Gallery / C-025 Bisquit
May 15, 2022, 06:30:07 PM
Course Correction
I decided to make a new rudder. The old rudder was perfectly fine however, the aperture was too small for the feathering prop I wanted to install. Also, I felt too much correction with the rudder was necessary in moderate to heavy air. I hate to mess with the original Alberg design. It is elegant and compliments the lines of the boat perfectly. However, I suspect my boat may have been delivered with a taller than standard rig. (Perhaps it was a Great Lakes – light air modification.) My P measurement is 1′ longer than than standard. Seat of the pants engineering led me to decide I needed to add 15% additional surface area on the trailing edge to help with the increased main sail area.
Initially I planned to open up the aperture and scarf some wood to the trailing edge but this stared to look too hacked together.
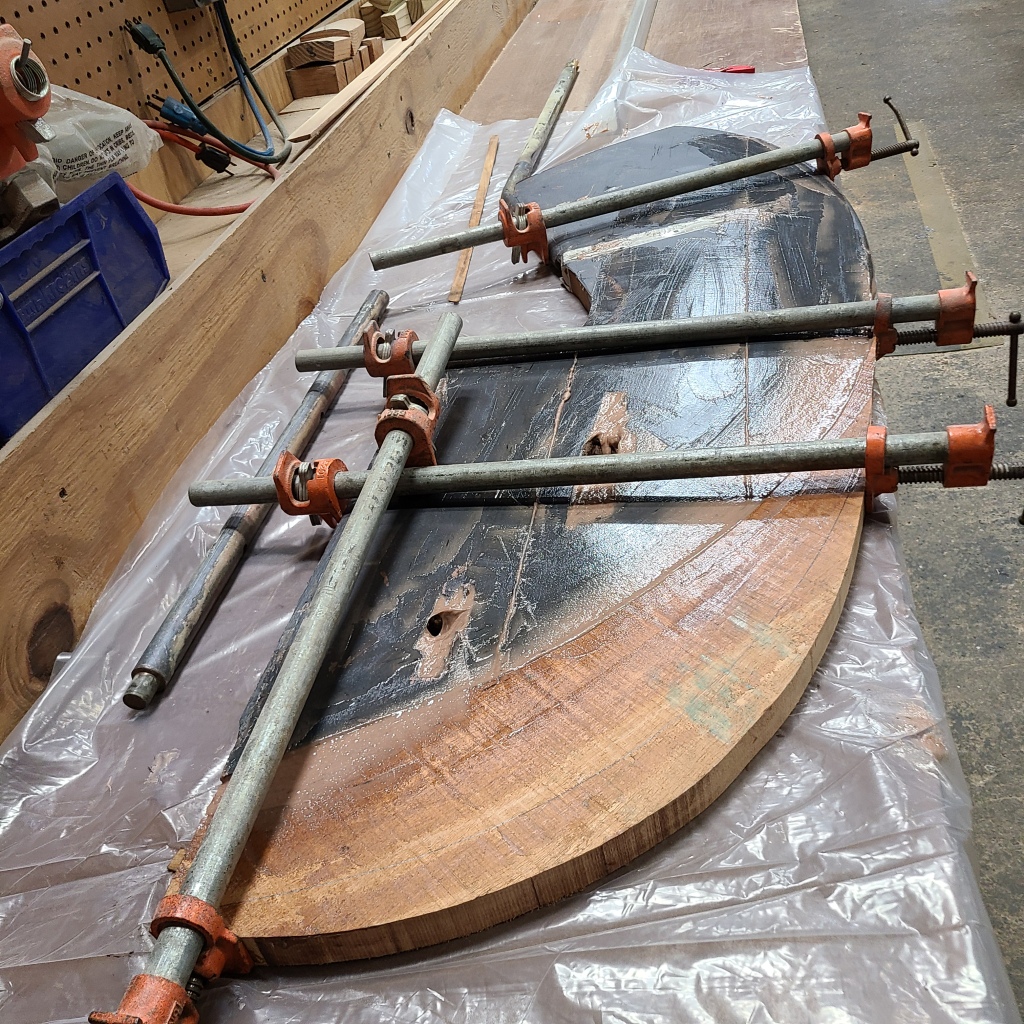
Abandoned Modification
Back to the drawing board. remove the original bronze shafts and build a new rudder. Luckily I happened across a 6/4 x 24″ mahogany board that would allow a one piece replacement. It is a testament to the quality of the bronze that Pearson used that, after almost 60 years, when I removed the nut access windows, the bronze tie rods unscrewed like they were assembles yesterday. Once removed, I used an induction heater to heat up the upper shaft and bend it back 30 degrees to allow for the larger aperture.
Next step is to make a template for the new rudder. I installed the new prop then made a Masonite blank and experimented with shapes that cleared the new prop, had the additional surface area, and looked like they belonged to this classic design.
https://bisquitreborn.files.wordpress.com/2022/05/20220406_160419-copy-1.jpg
Once I decided on a shape I cut the plank to the new shape, ran the leading edge through a router with a 1″ rounding bit to accept the upper and lower shafts, drilled holes for the tie rods, then using a 1 1/2″ hole saw made windows for the new nuts.
https://bisquitreborn.files.wordpress.com/2022/05/20220412_181048.jpg
New rudder faired with nut windows filled.
Next step is to install, coat with epoxy barrier coat and bottom paint.
https://bisquitreborn.files.wordpress.com/2022/05/20220416_112754-1-copy-1.jpg
On the boat
https://bisquitreborn.files.wordpress.com/2022/05/20220416_130151-copy-1.jpg
Barrier Coated with IP 2000 E
https://bisquitreborn.files.wordpress.com/2022/05/20220419_142029.jpg
Bottom Painted and ready to go
I decided to make a new rudder. The old rudder was perfectly fine however, the aperture was too small for the feathering prop I wanted to install. Also, I felt too much correction with the rudder was necessary in moderate to heavy air. I hate to mess with the original Alberg design. It is elegant and compliments the lines of the boat perfectly. However, I suspect my boat may have been delivered with a taller than standard rig. (Perhaps it was a Great Lakes – light air modification.) My P measurement is 1′ longer than than standard. Seat of the pants engineering led me to decide I needed to add 15% additional surface area on the trailing edge to help with the increased main sail area.
Initially I planned to open up the aperture and scarf some wood to the trailing edge but this stared to look too hacked together.
Abandoned Modification
Back to the drawing board. remove the original bronze shafts and build a new rudder. Luckily I happened across a 6/4 x 24″ mahogany board that would allow a one piece replacement. It is a testament to the quality of the bronze that Pearson used that, after almost 60 years, when I removed the nut access windows, the bronze tie rods unscrewed like they were assembles yesterday. Once removed, I used an induction heater to heat up the upper shaft and bend it back 30 degrees to allow for the larger aperture.
Next step is to make a template for the new rudder. I installed the new prop then made a Masonite blank and experimented with shapes that cleared the new prop, had the additional surface area, and looked like they belonged to this classic design.
https://bisquitreborn.files.wordpress.com/2022/05/20220406_160419-copy-1.jpg
Once I decided on a shape I cut the plank to the new shape, ran the leading edge through a router with a 1″ rounding bit to accept the upper and lower shafts, drilled holes for the tie rods, then using a 1 1/2″ hole saw made windows for the new nuts.
https://bisquitreborn.files.wordpress.com/2022/05/20220412_181048.jpg
New rudder faired with nut windows filled.
Next step is to install, coat with epoxy barrier coat and bottom paint.
https://bisquitreborn.files.wordpress.com/2022/05/20220416_112754-1-copy-1.jpg
On the boat
https://bisquitreborn.files.wordpress.com/2022/05/20220416_130151-copy-1.jpg
Barrier Coated with IP 2000 E
https://bisquitreborn.files.wordpress.com/2022/05/20220419_142029.jpg
Bottom Painted and ready to go
#5
Technical / Coaming-to-cabin filler block dimensions - Commander
January 07, 2021, 10:10:54 PM
Nice pictures. Very useful. I wish I had them before I wasted pile of mahogany using the trial and error method when I replaced my combings last year. In the end I ended up scarfing in a wedge to get it right.
#6
Technical / Hauling Out an Ariel with Crane and Straps
November 03, 2020, 06:56:20 PM
These boats are very solid and will support lifting just about any way you can think of. If you are using a single point lift with a spreader bar I would pick as Torrenson did. On the counter just aft of the rudder for the aft strap and the forward strap is set so it tensions at the same time as the aft strap so the boat will lift parallel with the ground. Once the straps are set you should rig a safety line. This is a rope tied between the forward and the aft strap below the water line so the forward strap does not slip when it is lifted. If the boat is in the water when lifting the safety line is tied at the sheer. Full keel boats especially need safety lines. We tie a safety line on every boat we lift.
#7
General/Off-Topic / 1965 Pearson Commander For Sale in Chicago
November 14, 2019, 08:08:28 AM
A local marine charity just received a donation of a commander. She needs some tlc but is in sound condition. Here is a link to the listing. I am sure they will entertain all reasonable offers.
See the details below.
https://www.sailboatlistings.com/view/83509
See the details below.
https://www.sailboatlistings.com/view/83509
#9
Gallery / Commander 89
February 04, 2019, 11:59:37 AM
I use a Dremel saw with the blade sit to 1/4" deep. Be careful not to cut too close to the toe rail. The outer skin and inner skin join there. I've attached a photo so you can see what I mean. Here is a link to a dropbox with a bunch of pictures of my deck recore project.
https://www.dropbox.com/sh/88ftelcejccvauy/AABB94DUHzbar_7Krmwx9RYba?dl=0
https://www.dropbox.com/sh/88ftelcejccvauy/AABB94DUHzbar_7Krmwx9RYba?dl=0
#11
Technical / rudder discussions
November 01, 2018, 09:58:38 AM
How is your weather helm? Did it increase with the added surface area of the new rudder?
#12
Gallery / Last Sail of the Season
October 22, 2018, 02:37:52 PM
In good company at the dock awaiting haul out
Nice sail to the yard
(don't know why the image is rotated)
Nice sail to the yard
(don't know why the image is rotated)
#14
General/Off-Topic / share some barrier coat?
September 06, 2018, 05:42:39 PM
I'll second Kurt's recommendation. I'm a big fan of 2000e. Have used it as a barrier coat, primer, bilge paint, and interior finish. It adheres really well, recoats quickly, sands easily and is available in white and gray. - like the lady in the hot sauce commercial "I put that **** on everything."
#15
Gallery / Commander 89
August 05, 2018, 08:22:53 PM
Good luck. Looks like you have lots of projects ahead. They will all be worth it. The Commander is a great boat.