
pulled the cover, cleaned some debris, sanded the hull and gave 3 coats of expoxy prime. I am hoping to paint the boat over the winter!
- Welcome to Ariel & Commander Owners.
Ariel & Commander Owners
This section allows you to view all posts made by this member. Note that you can only see posts made in areas you currently have access to.
#2
General/Off-Topic / Ariel 97 for sale
March 17, 2022, 12:01:31 PM
With a heavy heart, I must pass on Ariel #97 to another. I had originally purchased the boat and sailed it while my mother recovered from a SAH stroke in Washington DC. But, as thing happens, I engulfed myself in the huge project of retrofitting the entire boat. Well, six years later and it is not finished. I had made tremendous progress the first two years, nearly completing it. However, the boat has sat for a long while in my shop waiting, and waiting, and waiting… for me to return.
Quite frankly I have barely touched it these last couple years, as a matter of fact I may have added a couple more projects…
The retrofit, list, in no particular order:
1. Interior completely deleted and replaced with a unique design suitable for two to cruise Maine to the Bahamas. all interior plywood Okume BS1088 marine grade plywood. Sleeping for 4 (1 bunk under cockpit, large double in main salon, 1 bunk in bow) 85% complete
2. Retrofitted Four-Winns trailer motor boat trailer (2 axle w/disk brakes and pivoting tongue) 100% complete
3. Custom electric drive mount w/ 8.5K electric motor (complete electric motor kit has been mounted and test fit, but never tested/run), 75%
4. new PPY no drip drive shaft, 100%
5. new cutlas bearing, 100%
6. hull/deck seam fiberglassed, 100%
7. deck recored (previous owner), 100%
8. new stainless steel prop shaft, 100%
9. 3 blade (12x) prop, 100%
10. new main 4:1 sheet w/curved main sheet traveler, ready for mount
11. curved jib sheet tracks, ready for mount
12. rudder, completely new w/original bronze tiller shaft. needs final fiber and fairing. 90%
13. main sail, brand new (used a dozen times) Beacon Sails in Annapolis
14. hull mounted chain plates (interior), 90%
Extras:
1. I started designing / fabricating a bowsprit (18”) from 316 Stainless steel to help with the weather helm.
2.
What she needs:
1. rebuild cockpit coamings. I have 5/4 mahogany planks ready with pattern.
2. complete wiring, including electric drive integration and batteries.
3. needs all new lighting
4. electric drive testing
5. Remounting of all the original hardware
6. A name
Needs
1. The boat needs top side paint and deck painted.
Boat exterior has been sanded, faired and barrier coated.
2. interior cabinets needs to be finished, hardware installed and painted.
How much:
1. 7,000. (not including all the new build material or labor- just new unused parts: trailer 5-7k, main sail 1.5k, electric motor kit 2k)
2. I might be interested in partnerships…. if someone had some motivation and the ability to buy 50% stake in the project
for a quick response and direct contact info; 415-225-6177
thanks, matt
***google drive link for construction info and photos.***
https://drive.google.com/drive/folde...vh?usp=sharing
Quite frankly I have barely touched it these last couple years, as a matter of fact I may have added a couple more projects…
The retrofit, list, in no particular order:
1. Interior completely deleted and replaced with a unique design suitable for two to cruise Maine to the Bahamas. all interior plywood Okume BS1088 marine grade plywood. Sleeping for 4 (1 bunk under cockpit, large double in main salon, 1 bunk in bow) 85% complete
2. Retrofitted Four-Winns trailer motor boat trailer (2 axle w/disk brakes and pivoting tongue) 100% complete
3. Custom electric drive mount w/ 8.5K electric motor (complete electric motor kit has been mounted and test fit, but never tested/run), 75%
4. new PPY no drip drive shaft, 100%
5. new cutlas bearing, 100%
6. hull/deck seam fiberglassed, 100%
7. deck recored (previous owner), 100%
8. new stainless steel prop shaft, 100%
9. 3 blade (12x) prop, 100%
10. new main 4:1 sheet w/curved main sheet traveler, ready for mount
11. curved jib sheet tracks, ready for mount
12. rudder, completely new w/original bronze tiller shaft. needs final fiber and fairing. 90%
13. main sail, brand new (used a dozen times) Beacon Sails in Annapolis
14. hull mounted chain plates (interior), 90%
Extras:
1. I started designing / fabricating a bowsprit (18”) from 316 Stainless steel to help with the weather helm.
2.
What she needs:
1. rebuild cockpit coamings. I have 5/4 mahogany planks ready with pattern.
2. complete wiring, including electric drive integration and batteries.
3. needs all new lighting
4. electric drive testing
5. Remounting of all the original hardware
6. A name
Needs
1. The boat needs top side paint and deck painted.
Boat exterior has been sanded, faired and barrier coated.
2. interior cabinets needs to be finished, hardware installed and painted.
How much:
1. 7,000. (not including all the new build material or labor- just new unused parts: trailer 5-7k, main sail 1.5k, electric motor kit 2k)
2. I might be interested in partnerships…. if someone had some motivation and the ability to buy 50% stake in the project
for a quick response and direct contact info; 415-225-6177
thanks, matt
***google drive link for construction info and photos.***
https://drive.google.com/drive/folde...vh?usp=sharing
#3
I guess it would be obvious, but I havent had the opportunity to work on the boat in a very long time. It has been sitting in storage for the last 2 years.... and I dont think I will be returning to finish the job unless I get some renewed motivation. If someone is interested to purchase or partner in completing the project please dont hesitate to contact me. The boat is ready to roll (anywhere in the country).
best, matt
https://drive.google.com/file/d/1j2VdX7YpaO9_pX3vpng4hnV6CQQ2I6eE/view?usp=sharing
The retrofit, list, in no particular order:
1. Interior completely deleted and replaced with a unique design suitable for two to cruise Maine to the Bahamas. all interior plywood Okume BS1088 marine grade plywood. Sleeping for 4 (1 bunk under cockpit, large double in main salon, 1 bunk in bow) 85% complete
2. Retrofitted Four-Winns trailer motor boat trailer (2 axle w/disk brakes and pivoting tongue) 100% complete
3. Custom electric drive mount w/ 8.5K electric motor (complete electric motor kit has been mounted and test fit, but never tested/run), 75%
4. new PPY no drip drive shaft, 100%
5. new cutlas bearing, 100%
6. hull/deck seam fiberglassed, 100%
7. deck recored (previous owner), 100%
8. new stainless steel prop shaft, 100%
9. 3 blade (12x) prop, 100%
10. new main 4:1 sheet w/curved main sheet traveler, ready for mount
11. curved jib sheet tracks, ready for mount
12. rudder, completely new w/original bronze tiller shaft. needs final fiber and fairing. 90%
13. mail sail, brand new (used a dozen times) Beacon Sails in Annapolis
14. hull mounted chain plates (interior), 90%
Extras:
1. I started designing / fabricating a bowsprit (18”) from 316 Stainless steel to help with the weather helm.
What she needs:
1. rebuild cockpit coamings. I have 5/4 mahogany planks ready with pattern.
2. complete wiring, including electric drive integration and batteries.
3. needs all new lighting
4. electric drive testing
5. Remounting of all the original hardware
7. The boat needs top side paint and deck painted.
Basically, I would like to “finish” the boat by getting the boat ready to drop in the water. After that, it would be up to you to finish the interior and get the rest of the systems running.
How much:
1. I have no idea.
2. I might be interested in partnerships….
best, matt
https://drive.google.com/file/d/1j2VdX7YpaO9_pX3vpng4hnV6CQQ2I6eE/view?usp=sharing
The retrofit, list, in no particular order:
1. Interior completely deleted and replaced with a unique design suitable for two to cruise Maine to the Bahamas. all interior plywood Okume BS1088 marine grade plywood. Sleeping for 4 (1 bunk under cockpit, large double in main salon, 1 bunk in bow) 85% complete
2. Retrofitted Four-Winns trailer motor boat trailer (2 axle w/disk brakes and pivoting tongue) 100% complete
3. Custom electric drive mount w/ 8.5K electric motor (complete electric motor kit has been mounted and test fit, but never tested/run), 75%
4. new PPY no drip drive shaft, 100%
5. new cutlas bearing, 100%
6. hull/deck seam fiberglassed, 100%
7. deck recored (previous owner), 100%
8. new stainless steel prop shaft, 100%
9. 3 blade (12x) prop, 100%
10. new main 4:1 sheet w/curved main sheet traveler, ready for mount
11. curved jib sheet tracks, ready for mount
12. rudder, completely new w/original bronze tiller shaft. needs final fiber and fairing. 90%
13. mail sail, brand new (used a dozen times) Beacon Sails in Annapolis
14. hull mounted chain plates (interior), 90%
Extras:
1. I started designing / fabricating a bowsprit (18”) from 316 Stainless steel to help with the weather helm.
What she needs:
1. rebuild cockpit coamings. I have 5/4 mahogany planks ready with pattern.
2. complete wiring, including electric drive integration and batteries.
3. needs all new lighting
4. electric drive testing
5. Remounting of all the original hardware
7. The boat needs top side paint and deck painted.
Basically, I would like to “finish” the boat by getting the boat ready to drop in the water. After that, it would be up to you to finish the interior and get the rest of the systems running.
How much:
1. I have no idea.
2. I might be interested in partnerships….
#4
Man, it has been forever! thank god Photobucket hasnt completely deleted my photos....
However, because I wanted to share ALL of the photos, models, drawings and data of the rebuild of A97 I have uploaded them to to my google drive.
https://drive.google.com/drive/folders/1reBXSG4gepAlZ5V5gcn1dOzfebXdn5vh?usp=sharing
Contents:
1 - Spec Drawings
cleaned up original "lines" drawings
vector files of the "lines" drawings
original/novel interior drawings
3D models
2 - Construction photos
pretty self explanatory
3 - Electric Conversion
Useful calculator and electric info (as of 2014)
Custom electric drive mount (drawings and model)
4 - Logo Emblem
Original Ariel emblem pattern in PDF (vector file editable with adobe illustrator)
various logo images
5 - Rigging
v1 New mast head sheave box designed by Destiny (mike)
v2 Newest mast head design with "over-under" sheave placement.
Other various rigging info
7 - Trailer
Trailer design and info
construction images
8 - 1960s Brochure
Original artwork and brochure of the pearson ariel
9 - Previous Owners
1st and 2nd owner images
However, because I wanted to share ALL of the photos, models, drawings and data of the rebuild of A97 I have uploaded them to to my google drive.
https://drive.google.com/drive/folders/1reBXSG4gepAlZ5V5gcn1dOzfebXdn5vh?usp=sharing
Contents:
1 - Spec Drawings
cleaned up original "lines" drawings
vector files of the "lines" drawings
original/novel interior drawings
3D models
2 - Construction photos
pretty self explanatory
3 - Electric Conversion
Useful calculator and electric info (as of 2014)
Custom electric drive mount (drawings and model)
4 - Logo Emblem
Original Ariel emblem pattern in PDF (vector file editable with adobe illustrator)
various logo images
5 - Rigging
v1 New mast head sheave box designed by Destiny (mike)
v2 Newest mast head design with "over-under" sheave placement.
Other various rigging info
7 - Trailer
Trailer design and info
construction images
8 - 1960s Brochure
Original artwork and brochure of the pearson ariel
9 - Previous Owners
1st and 2nd owner images
#5
General/Off-Topic / Ariel #97 for sale?
December 03, 2018, 07:52:12 PM
With a heavy heart, I must pass on my Ariel rebuild to another. I had originally purchased the boat and sailed it while my mother recovered from a SAH stroke in Washington DC. But, as thing happens, I engulfed myself in the huge project of retrofitting the entire boat. Well, six years later and it is not finished. I had made tremendous progress the first two years, nearly completing it. However, the boat has sat for a long while in my shop waiting, and waiting, and waiting… for me to return.
Quite frankly I have barely touched it these last couple years, as a matter of fact I may have added a couple more projects…
The retrofit, list, in no particular order:
1. Interior completely deleted and replaced with a unique design suitable for two to cruise Maine to the Bahamas. all interior plywood Okume BS1088 marine grade plywood. Sleeping for 4 (1 bunk under cockpit, large double in main salon, 1 bunk in bow) 85% complete
2. Retrofitted Four-Winns trailer motor boat trailer (2 axle w/disk brakes and pivoting tongue) 100% complete
3. Custom electric drive mount w/ 8.5K electric motor (complete electric motor kit has been mounted and test fit, but never tested/run), 75%
4. new PPY no drip drive shaft, 100%
5. new cutlas bearing, 100%
6. hull/deck seam fiberglassed, 100%
7. deck recored (previous owner), 100%
8. new stainless steel prop shaft, 100%
9. 3 blade (12x) prop, 100%
10. new main 4:1 sheet w/curved main sheet traveler, ready for mount
11. curved jib sheet tracks, ready for mount
12. rudder, completely new w/original bronze tiller shaft. needs final fiber and fairing. 90%
13. mail sail, brand new (used a dozen times) Beacon Sails in Annapolis
14. hull mounted chain plates (interior), 90%
Extras:
1. I started designing / fabricating a bowsprit (18”) from 316 Stainless steel to help with the weather helm.
2. A whole bunch of extra original parts
What she needs:
1. rebuild cockpit coamings. I have 5/4 mahogany planks ready with pattern.
2. complete wiring, including electric drive integration and batteries.
3. needs all new lighting
4. electric drive testing
5. Remounting of all the original hardware
6. A name
What I will provide:
1. The boat needs barrier coat, top side paint and deck painted. Colors of your choice!!
Basically, I would like to “finish” the boat by getting the boat ready to drop in the water. After that, it would be up to you to finish the interior and get the rest of the systems running.
How much:
1. I have no idea. I am not in any rush to sell, but basically, I am trying to buy a house in the next couple years and would like to free up space in my shop to complete other paying work.
2. I might be interested in partnerships…. if someone had some motivation and the ability to buy 50% stake in the project
I lost my website dedicated to the rebuild but here is an old online photo depository.
http://s1354.photobucket.com/user/a9...?sort=3&page=1
I can send new photos upon request.
matt
415.225.6177
philadelphia
Quite frankly I have barely touched it these last couple years, as a matter of fact I may have added a couple more projects…
The retrofit, list, in no particular order:
1. Interior completely deleted and replaced with a unique design suitable for two to cruise Maine to the Bahamas. all interior plywood Okume BS1088 marine grade plywood. Sleeping for 4 (1 bunk under cockpit, large double in main salon, 1 bunk in bow) 85% complete
2. Retrofitted Four-Winns trailer motor boat trailer (2 axle w/disk brakes and pivoting tongue) 100% complete
3. Custom electric drive mount w/ 8.5K electric motor (complete electric motor kit has been mounted and test fit, but never tested/run), 75%
4. new PPY no drip drive shaft, 100%
5. new cutlas bearing, 100%
6. hull/deck seam fiberglassed, 100%
7. deck recored (previous owner), 100%
8. new stainless steel prop shaft, 100%
9. 3 blade (12x) prop, 100%
10. new main 4:1 sheet w/curved main sheet traveler, ready for mount
11. curved jib sheet tracks, ready for mount
12. rudder, completely new w/original bronze tiller shaft. needs final fiber and fairing. 90%
13. mail sail, brand new (used a dozen times) Beacon Sails in Annapolis
14. hull mounted chain plates (interior), 90%
Extras:
1. I started designing / fabricating a bowsprit (18”) from 316 Stainless steel to help with the weather helm.
2. A whole bunch of extra original parts
What she needs:
1. rebuild cockpit coamings. I have 5/4 mahogany planks ready with pattern.
2. complete wiring, including electric drive integration and batteries.
3. needs all new lighting
4. electric drive testing
5. Remounting of all the original hardware
6. A name
What I will provide:
1. The boat needs barrier coat, top side paint and deck painted. Colors of your choice!!
Basically, I would like to “finish” the boat by getting the boat ready to drop in the water. After that, it would be up to you to finish the interior and get the rest of the systems running.
How much:
1. I have no idea. I am not in any rush to sell, but basically, I am trying to buy a house in the next couple years and would like to free up space in my shop to complete other paying work.
2. I might be interested in partnerships…. if someone had some motivation and the ability to buy 50% stake in the project
I lost my website dedicated to the rebuild but here is an old online photo depository.
http://s1354.photobucket.com/user/a9...?sort=3&page=1
I can send new photos upon request.
matt
415.225.6177
philadelphia
#6
General/Off-Topic / share some barrier coat?
September 06, 2018, 08:46:00 PM
i ground/sanded the hull a couple years ago.... and no blisters, however, the gel coats was crazed like crazy and I was already dealing with numerous other issues below the waterline. But, When I started sanding i didnt realize just how much work it was going to be, otherwise I would not have considered it. HA.
anyway, i will research Interprotect 2000e. thanks
anyway, i will research Interprotect 2000e. thanks
#7
General/Off-Topic / share some barrier coat?
September 05, 2018, 09:13:07 PM
I am finally getting ready to barrier coat my hull. I have been buying my epoxy from epoxyproducts.com which has been great (aside from his crazy website), very good products at a reasonable cost.
well, except barrier coat... he only sells a 3 gal barrier coat minimum. (Actually, he sells by the qt but that would be double the price.) Anyway, I have "calculated" and read, that we only need 1-1.5 gal to coat the hull below the waterline.
So the question is: would anyone like to split 3 Gal of barrier coat (water gard 300) from epoxyproducts.com
http://www.king-cart.com/cgi-bin/cart.cgi?store=epoxy&product=..Epoxy+paints&cart_id=18853.8710&user-id=&password=&exchange=&exact_match=exact
price currently 422.00 plus tax+shipping
lemme know, matt
well, except barrier coat... he only sells a 3 gal barrier coat minimum. (Actually, he sells by the qt but that would be double the price.) Anyway, I have "calculated" and read, that we only need 1-1.5 gal to coat the hull below the waterline.
So the question is: would anyone like to split 3 Gal of barrier coat (water gard 300) from epoxyproducts.com
http://www.king-cart.com/cgi-bin/cart.cgi?store=epoxy&product=..Epoxy+paints&cart_id=18853.8710&user-id=&password=&exchange=&exact_match=exact
price currently 422.00 plus tax+shipping
lemme know, matt
#8
General/Off-Topic / "third party image hosting has been disabled" - Google Drive work around
March 17, 2018, 05:53:04 PM
wow, writing that out was intense! However, once you get the hang of it, it is actually pretty easy.
#9
General/Off-Topic / "third party image hosting has been disabled" - Google Drive work around
March 17, 2018, 05:20:00 PM
I believe some of you are having the same issue that I have found myself, which is Photobucket is no longer a free service and is now holding images ransom. If you have 40 bux a month to spend on their ****ty service, by all means, pay them to host your images, no judgement from me.
However, I have found a "free" work-around to this problem if you have a Google Drive account. To be clear, there are many other "free" ways to host your images on the internet- I am just sharing a little info with you in regards to how I solved this problem with a Google Drive account which I already had...
So, if you are like me with a couple hundred images hosted with Photobucket spread over several forums, blogs and websites than this can be a pretty time consuming undertaking, but since I already have a Google Drive account with plenty of storage space I feel better about my content being safe from being held ransom in the future. (btw, I actually pay for my Google Drive account, but this would not change any of the steps involved)
First of all, I am going to try to explain this to all you luddites out there caressing the 1960's alberg details of the ariel/commander, but I am no computer science major, nor a teacher so to start I would highly suggest watching this video.
https://www.youtube.com/watch?v=lBqRu5wEYjI
Ok, now that you have an idea of what to expect, this is what I have had to do to make the images work in the pearsonariel.org forum:
1. Image size - images hosted with Google Drive wont be optimized for web, meaning if you upload a raw image directly from your camera, than the image displayed in the forum will be huge and wont fit into the post window. For example, my iPhone take images that are approx. 4000 x 2672 pixels, but the ariel forum post window is in the neighborhood of 700-900 pixels, so you will need to compress the images to something more reasonable. There are applications that can do this for you.... I use photoshop.
2. Google Sharing- make a new Google Drive Folder and share the folder with anyone on the internet
3. Add web optimized images to the Google Drive Folder
4. Open a text editing program - Text Edit, Microsoft Office or similar
5. Copy and paste this into a new document in your preferred text editing program:
https://drive.google.com/uc?export=view&id=
6. Go to your Google Drive account, find the image that you want, Share the file with anyone, then copy the link.
7. Paste the link you just got from Google Drive into your text editing program, some where below snippet that you already copied from #5
8. Delete and change the file string of the url from the Google Drive image- You will need to delete all the characters in front of and after the actual file name. Then paste the file name behind the the snippet that I had you copied from #5.
(Get rid of this - //drive.google.com/file/d/ and this /view?usp=sharing)
9. Add image tags to the beginning and end of the link -

When you are done, the url of your Google Drive image should look like this- (LITTLE_RED_BOAT is a sample file name)

However, I have found a "free" work-around to this problem if you have a Google Drive account. To be clear, there are many other "free" ways to host your images on the internet- I am just sharing a little info with you in regards to how I solved this problem with a Google Drive account which I already had...
So, if you are like me with a couple hundred images hosted with Photobucket spread over several forums, blogs and websites than this can be a pretty time consuming undertaking, but since I already have a Google Drive account with plenty of storage space I feel better about my content being safe from being held ransom in the future. (btw, I actually pay for my Google Drive account, but this would not change any of the steps involved)
First of all, I am going to try to explain this to all you luddites out there caressing the 1960's alberg details of the ariel/commander, but I am no computer science major, nor a teacher so to start I would highly suggest watching this video.
https://www.youtube.com/watch?v=lBqRu5wEYjI
Ok, now that you have an idea of what to expect, this is what I have had to do to make the images work in the pearsonariel.org forum:
1. Image size - images hosted with Google Drive wont be optimized for web, meaning if you upload a raw image directly from your camera, than the image displayed in the forum will be huge and wont fit into the post window. For example, my iPhone take images that are approx. 4000 x 2672 pixels, but the ariel forum post window is in the neighborhood of 700-900 pixels, so you will need to compress the images to something more reasonable. There are applications that can do this for you.... I use photoshop.
2. Google Sharing- make a new Google Drive Folder and share the folder with anyone on the internet
3. Add web optimized images to the Google Drive Folder
4. Open a text editing program - Text Edit, Microsoft Office or similar
5. Copy and paste this into a new document in your preferred text editing program:
https://drive.google.com/uc?export=view&id=
6. Go to your Google Drive account, find the image that you want, Share the file with anyone, then copy the link.
7. Paste the link you just got from Google Drive into your text editing program, some where below snippet that you already copied from #5
8. Delete and change the file string of the url from the Google Drive image- You will need to delete all the characters in front of and after the actual file name. Then paste the file name behind the the snippet that I had you copied from #5.
(Get rid of this - //drive.google.com/file/d/ and this /view?usp=sharing)
9. Add image tags to the beginning and end of the link -
When you are done, the url of your Google Drive image should look like this- (LITTLE_RED_BOAT is a sample file name)
#10
ugh. its been a while since i have worked on the boat, even though I see it everyday sitting in my shop. Even more annoying is Photobucket forcing me to pay for 3rd party hosting of all the build images.... so lame. I was emailed by a gentleman who wanted to see some of the images of the build, I had not put 2+2 together to figure out why he was not able to view the images on the forum.
anyone have a silver bullet? if someone can give me a good solution I swear I will do some work on the boat!
anyone have a silver bullet? if someone can give me a good solution I swear I will do some work on the boat!
#12
wow, that is a nifty bowsprit, though I dont see what the pivot is about. The Trogear is a pretty nice bit of kit as well. However, I am making a permanent bowsprit for the forestay. Currently, I have decided to set the distance at 18" from the bow, nothing extreme. As I said, I am trying to balance the rig a bit without having to shorten the sail area... some of you all are probably rolling your eyes. Nonetheless, I work at a metal fab shop and so far this little experiment has cost me nothing.
as a side note.. I am taking on more side work (design & fabrication) as I begin transitioning myself towards opening my own shop, so if any of you guys have some fab work let me know. For example, one thing I was thinking of making extra are some SS trim rings for the aluminum opening ports. The cast aluminum trim rings that I have are in many pieces. I am going to laser cut 12ga SS ovals... when I get a chance
as a side note.. I am taking on more side work (design & fabrication) as I begin transitioning myself towards opening my own shop, so if any of you guys have some fab work let me know. For example, one thing I was thinking of making extra are some SS trim rings for the aluminum opening ports. The cast aluminum trim rings that I have are in many pieces. I am going to laser cut 12ga SS ovals... when I get a chance
#13
A quick thanksgiving update to the bowsprit. The basic idea is that the stem head fitting will be bolted down to the bow in the usual manner and the bowsprit will bolt to the top of the stem head fitting via 3, 1/2x13 bolts. I have yet to figure out the 'cranse iron' which will be welded to the end of the bowsprit to attach the shrouds and bobstay. Since the bowsprit is bolted I can modify or replace if necessary.
Also, near the 'sampson post' I will have a fitting to accept a removable solent stay for heavy weather. This is not going to be a cutter rig, however I want the option for a smaller sail in heavy weather. The top of solent stay would be attached near the masthead, so that I would not need to have running backstays.


Also, near the 'sampson post' I will have a fitting to accept a removable solent stay for heavy weather. This is not going to be a cutter rig, however I want the option for a smaller sail in heavy weather. The top of solent stay would be attached near the masthead, so that I would not need to have running backstays.


#14
and thinking seriously about a bowsprit. The biggest reason is to push the COE forward to balance the boat a bit and reduce weather helm. So far, im thinking 18" or less.

with a tow rail cap, currently mocked up in foam, and a winch (windlass?)

The SS oval tube is just some scrap material I had lying around at work... I liked the shape.


with a tow rail cap, currently mocked up in foam, and a winch (windlass?)

The SS oval tube is just some scrap material I had lying around at work... I liked the shape.

#15
upon water lines... now that I have ground, sanded and faired, I am thinking about the process of adding the barrier coat below the waterline and how I will lose the scribed line. So, I grabbed a laser from work to see what I was up against..
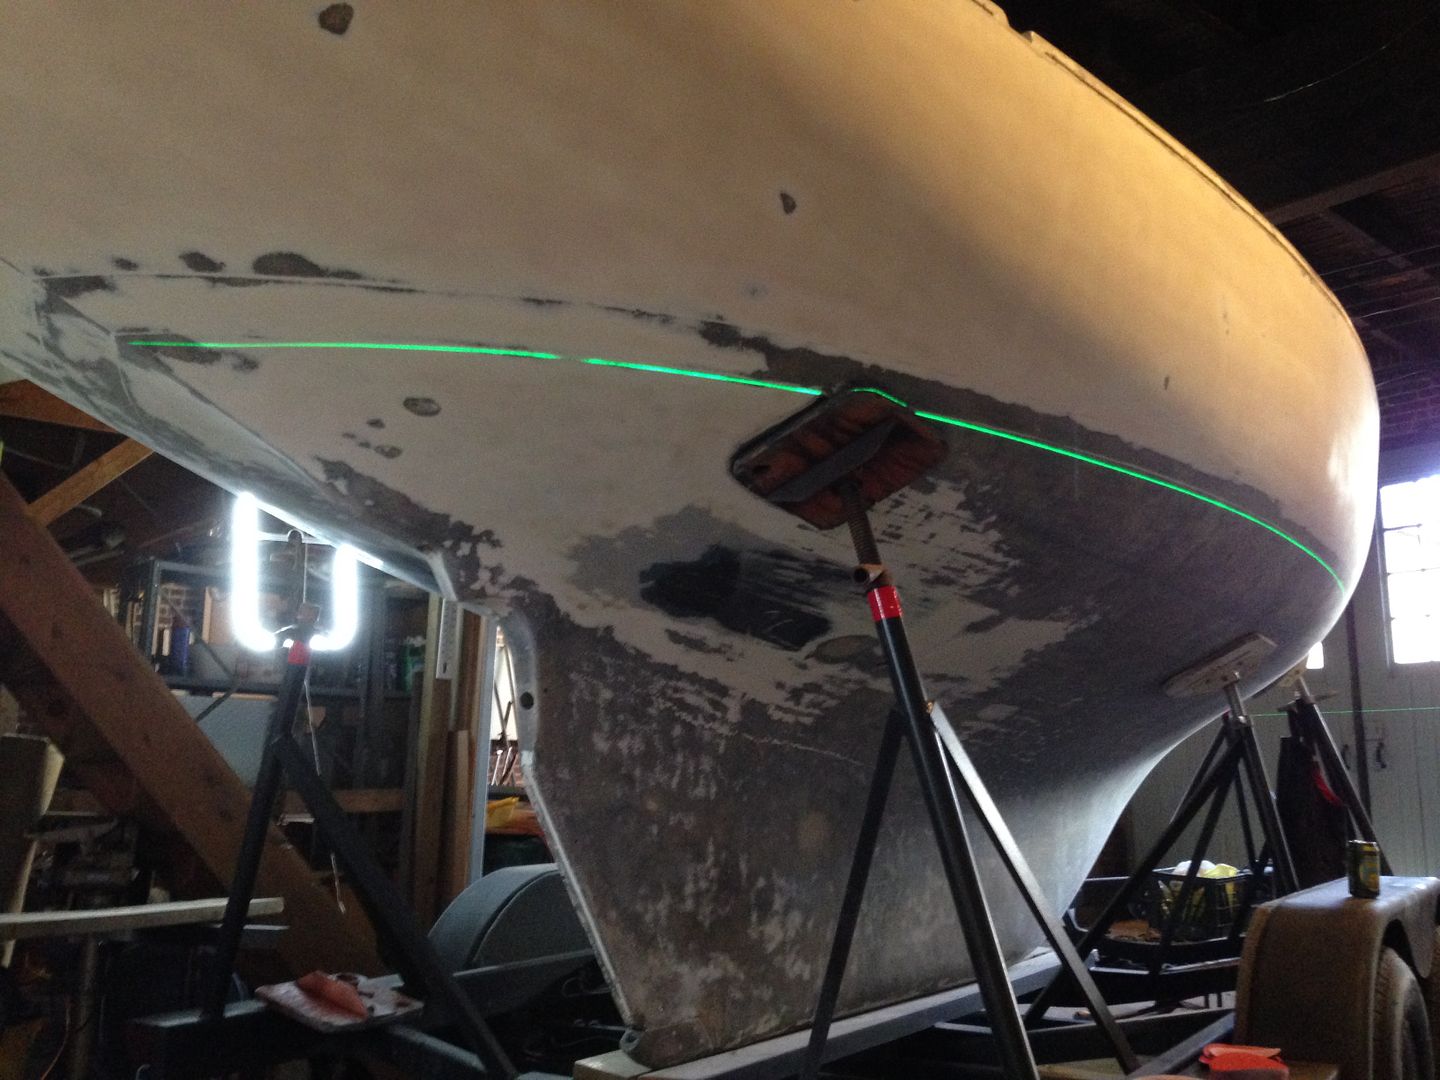
however, after leveling the boat and lining up the laser as best I could... the molded/scribed line is either screwy or I am. Maybe a little hard to tell, but the scribed line is higher than the laser at the mid point.
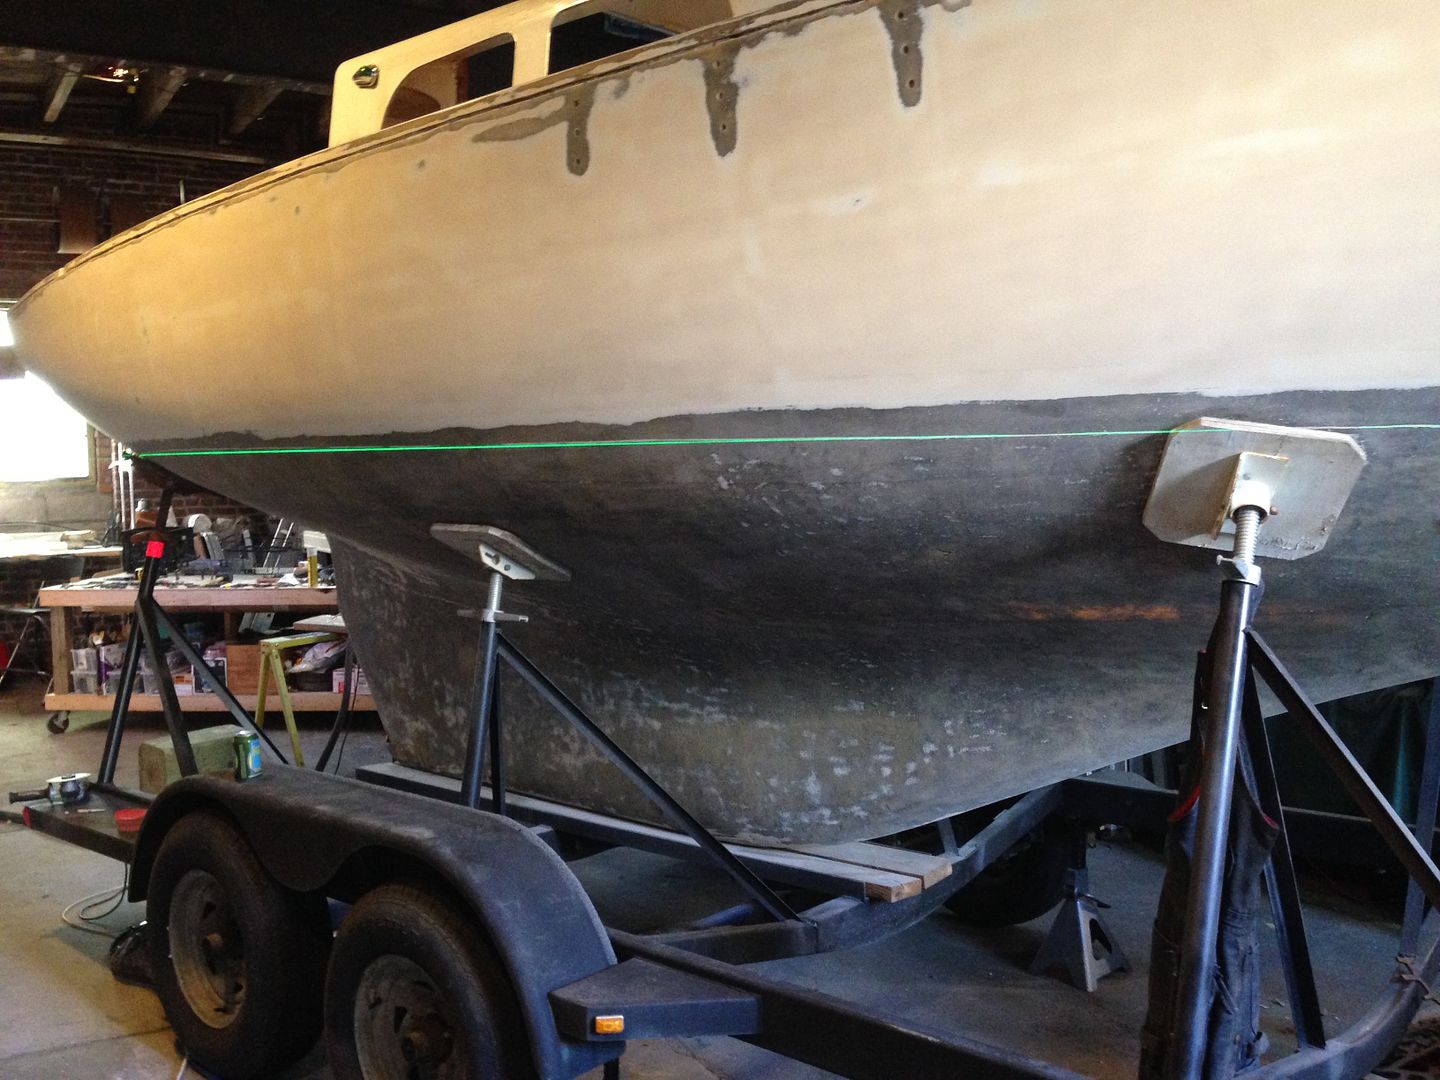
pretty neat how the scribed line actually makes a deviation from the actual waterline near the rudder. This, I know, was purposeful to create a beautiful waterline. But the above picture... im not sure.
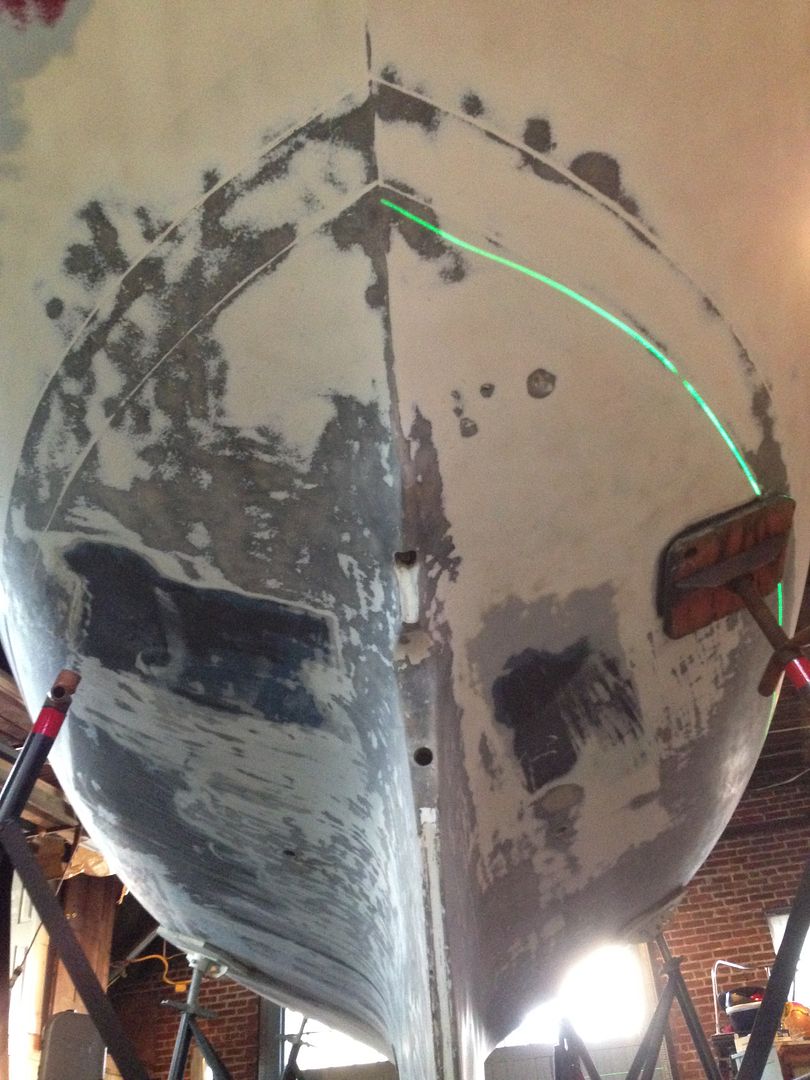
Anyway, when I barrier coat the raw fiberglass I am going to lose the waterline mark. Is it weird that I want to use the "string & batter board" method? As done by Tim Lackey and Louis Sauzedde, instead of using a laser? Just seems like a puff of wind or a curious kitten knocking the laser is going to ruin my day, whereas a string and some tape could be edited. Either way, I will need to take measurements from the toe rail at various points.

however, after leveling the boat and lining up the laser as best I could... the molded/scribed line is either screwy or I am. Maybe a little hard to tell, but the scribed line is higher than the laser at the mid point.

pretty neat how the scribed line actually makes a deviation from the actual waterline near the rudder. This, I know, was purposeful to create a beautiful waterline. But the above picture... im not sure.

Anyway, when I barrier coat the raw fiberglass I am going to lose the waterline mark. Is it weird that I want to use the "string & batter board" method? As done by Tim Lackey and Louis Sauzedde, instead of using a laser? Just seems like a puff of wind or a curious kitten knocking the laser is going to ruin my day, whereas a string and some tape could be edited. Either way, I will need to take measurements from the toe rail at various points.