News:

The Forum is back!

Main Menu
Menu

Show posts

This section allows you to view all posts made by this member. Note that you can only see posts made in areas you currently have access to.

Show posts Menu

Messages - Triton106

#1
Technical / Rant: The fallacy of big boats being safer
September 24, 2014, 01:17:29 AM
Mike wrote -

QuoteAfter my little foray with the SS23, however, I did become quite infatuated with the function and looks of the fractional rig and spent all last winter with a spreadsheet trying to figure out how to put a Triton mast on an Ariel to add more sail area with a smaller headsail...

There, another reason to upgrade to a Triton...
#2
Technical / Rant: The fallacy of big boats being safer
September 19, 2014, 11:57:14 PM
Hey Mike, I read that you are sailing a boat even smaller boat than the Ariel, a Sea Sprite 23, for the time being.  What do you have to do to prevent your crew from falling off such a small boat? ;)
#3
Technical / Rant: The fallacy of big boats being safer
September 19, 2014, 08:34:48 PM
Patrick, with all due respect your Ariel is too small to go out the gate.  Now if you upgrade to a Triton that would be a different story. :cool:
 
Blossom
Triton 106
Alameda, CA
#4
Technical / Deck joint-Who, What and When
January 09, 2014, 12:49:50 AM
Ebb wrote -
 
QuoteJoshua Slocum found Spray languishing in a Gloucester field. Shortened it by cutting the middle out. Rigged it and went sailing.
Don't know if he had help, but the boat was 38 feet, wasn't it? I've always thought that guys and gals in the old days had more stamina, more wear-with-all, piss and vinegar and plain guts. Harry Pidgeon was another...built his boat from the keel up.... and also circumnavigated the planet!

I recent re-read Joshua Slocum's classic "Sailing Alone Around the World".  I am pretty sure he did no have help (not in any material way) in rebuilding Spray.  What's more amazing is that he took on the process from cutting the trees for lumber to making the spars.  Not only, he sailed alone through Magellan Strait while outsmarting the cunning natives without any autopilot, or engine, or radar.  Honestly, I don't think there are that many people who could accomplish such a feat, in the past or present.
 
Harry Pidegon, the second person to solo circumnavigate the world, is equally impressive.  Not the least of which is that he is the first one to circumnavigate twice, two and half times to be more exact.
 
Ebb wrote -
 
QuoteA small percentage of those boats make it out of the yard to sail far again.
If VentoDea hasn't been trashed, with some effort she could feel the wind dipping her rail again....seamlessly!

Thing is, VentoDea the Triton, crippled as she was, got the 3-Knots band safely back to land - had the good will and stamina to get her people and the dog to safety....

As tough as Tritons are I don't think Vento Dea's owners could have survived if they were hit by a second freak wave.  They were fortunate that the sea was relatively calm after the accident and they were close to the shoreline and are young and tough.  I share your sentiment for saving every worthy plastic classics.  At the same time I completely understand that sometimes economics just don't permit it.  In this case, the boat is in some remote Colombia shore without any real marine facilities, supplies, or even reliable supply of electricity.  It will be an extremely challenging rescue project for anyone to take on.  In the mean time there are many boats available at lien sales for a song.  It would be much more economical to buy a lien sale boat and restore it than to fly to Colombia and pay for housing and maybe even government fees to take over the ownership of the boat and import duties for all of the supplies and parts.
 
In the meantime v-berth project on Blossom continues.  I have glassed in the new bulkhead with two layers of biaxial tape on each side.  I have also installed and glassed in chainplate knees athwartship.  Currently waiting for the new water tank to arrive (Ronco model B126 fits perfectly under Triton v-berth).  I will be posting more progress pictures shortly, maybe on a separate thread since some of it maybe unrelated to the subject topic of this thread.
#5
Technical / Deck joint-Who, What and When
December 30, 2013, 12:48:25 AM
Ebb wrote:
Quote[Just looked back at Tim's surgery of his day sailor that you posted here = pg 3 #54.
For the first time SEE that the Triton hull/deck seam in his photo is a BUTT-JOINT. Not the usual protruding Triton lap join we are talking about.
His text says that what we're looking at is 1/4" laminations - but it sure looks thicker than that.
It's obvious we are looking at an early version of the joint that all Ariels and Commanders have...

As far as I know east coast Triton hull deck are joined together via butt-joint and west coast Triton have externally flanged hull deck joints.
 
QuoteSo, complimentary build-up along the sheer, just below the sheer on the hull, might be wise.
Also, when you add back the anchor locker, you can extend wider tabbing on to the hull. Both from the bulkhead and also imco in adding strapping to prevent photgraphing (bulging) of the bulkhead on to hull* - that is if your hull is truly skinny.

I debated as to how many layers to add to the existing internal tabbing. I initially thought of adding three layers but after grinding/cleaning the hull deck joint in the v-berth I felt better about it. I decided to go with two layers of biaxial. As mentioned in the previoius post the first layer used is 1708 without mat backing and the second layer uses is 1808 with mat backing. This adds approximately 1/8" total thickness to the hull in the gunwale area.  Based on what I have seen the hull thickness near the gunwale is approximately 1/4" that Tim mentioned in his day sailor project.
 
QuoteYou will be adding color back in the form of epoxy sealer over the polyester.
If you are living onboard for extended times, you might be adding insulation (Ariel discussion forum.)

Yes, definitely plan to paint the v-berth after the bulkhead goes back in. I also plan to add wood ceiling to finish the hull with insulation underneath it.
 
The project scope is creeping though. I just ripped out the v-berth itself to enable access to add a 30 gal water tank. Also replacing the original longitudinal forward lower chainplate knees with athwartship knees made of g-10. When completely glassed in to the hull and underside of the deck it will further strengthen the hull deck joint.  I already mentioned that the bulkhead is being moved forward by 6 inches. Looks like I won't be sailing for a few months.
#6
General/Off-Topic / Happy Holidays to all
December 26, 2013, 01:19:34 AM
Happy Holidays Tony and thanks to you and others on this forum that bring so much knowledge and experience to the enrich the discussions.  Here is to another year of wholesome, interesting, and productive boat projects and sailing!
#7
Technical / Deck joint-Who, What and When
December 25, 2013, 11:50:14 AM
Happy Holidays Everyone!

Ebb, you made a compelling argument and offered a great technical solution for external tabbing as a solution for externally flanged hull deck joints such as the west coast Tritons.  If the particulars of my Triton and the sequence of restoration projects had been different I would seriously consider this option.  Alas, that is not the case.  I am moving forward with internal tabbing as an alternative solution.

Having almost completed the project in the lazarette and v-berth I have learned and relearned some of the lessons I want to share with others who might be considering a project like this.

1. As much as possible improve the project working condition by getting the right tools, the best eye, ear, and breathing protection equipment you can afford in advance of starting the project.  Grinding fiberglass in the lazarette and v-berth is a miserable job.  Do your best to make the condition as tolerable as possible.  Ebb and Tony already mentioned some of the ideas.  I used DeWalt angle grinder that I already have and I wish I could afford the Italian angle grinder that Ebb mentioned but it costs almost $600.  One tool that help me a lot in grinding out the toe rail cavity is the 6 inch coarse wire wheel.  No other tool could reach that area.  Thanks Tony for that idea!

2. After cleaning up wet out the joint with epoxy AND, very importantly, smooth out the existing tabbing edges and uneven spots with thickened epoxy.  Unless you are extremely fortunate there will be many areas that need to be evened out.  I did not do a thorough job of it in the lazarette and ended up with a couple of air pockets which you want to avoid.  It would also be very helpful when you wet out the fiberglass to lightly coat it with slightly thickened epoxy.  West System book mentioned this point which I did not thoroughly appreciate why until now.  It make the bonding with existing glass so much more stronger, especially you are glassing the tabbing upside down.

3. I would also avoid 1708 bixial tape without the mat backing.  I strongly prefer 1808 with mat backing.  The 1708, when wet out, becomes a limp soggy mess whereas the 1808 has a lot more structure and is much easier to massage into the awkward space in the toe rail cavity.  I also believe the 1808 is a lot stronger.  Ironically, I paid $28 for 2 yards of 1708 at Svendsens and only $24 for 2 yards of 1808 at Tap Plastics.

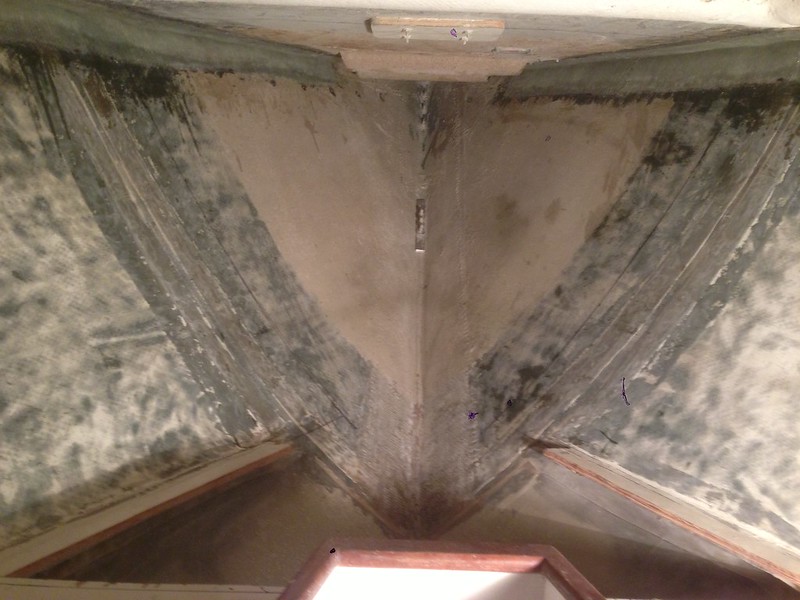
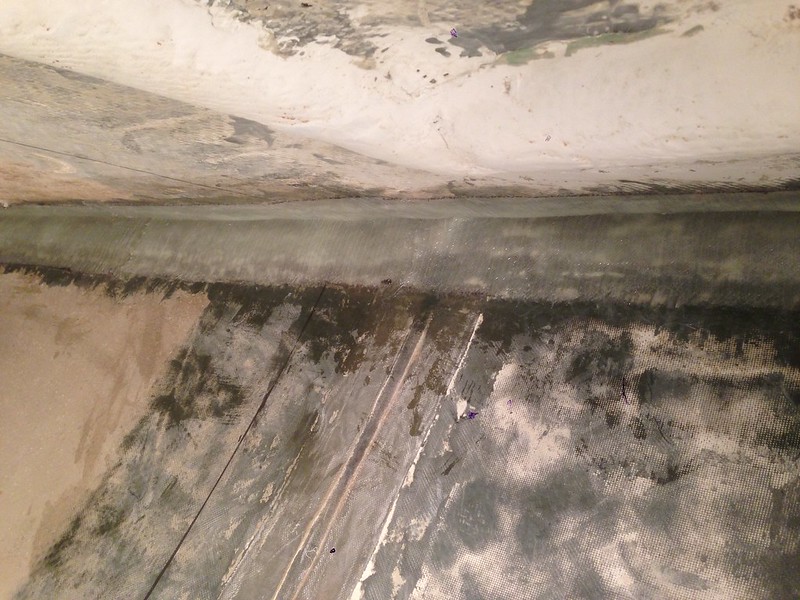
Here are a few pictures of the finished internal tabbings in the v-berth.  As you can see I removed the original anchor locker bulkhead.  The lower part of the plywood has signs of rotting and delamination.  I plan to move the bulkhead forward 6 inches to make the v-berth more hospitable for taller people as the existing v-berth is only 6 feet long.  Not the least it makes the tabbing project so much easier.  I cannot imagine grinding fiberglass wedged inside the anchor locker.

One more detail to note - careful reader might notice that the upper and lower edges of the fiberglass tape are not even in some spots.  It is not because I did not cut the tape evenly, the tapes are exactly 6 inches in the first layer and 8 inches in the second layer.  They are uneven because the toe rail cavities are not uniform.  Some areas the cavity goes all the way up, other areas the cavity is very shallow, all depends on how well the original factory worker applied the original glass job.  This is another reason why internal tabbing is easier because no one will see the uneven finish.  I am sure Ebb and Tony would have gone back and finished the edge just so perfectly.  But craftsman like Ebb and Tony I am not.  I am just a sailor who is trying to make his boat more seaworthy.:o


#8
Technical / Deck joint-Who, What and When
December 18, 2013, 02:26:28 AM
Well put Ebb!!!
 
I don't know the primary culprit for the Pearson A/C/T/R hull deck joint weakness discussed here.  I don't know if that really matters.  The bottomline is that they are not strong enough to survive a freak wave or a fall from a travel lift.  I am much more interested in efficient and effective ways to address the issue.  I think the three basic solutions as well as any permeatation of the these solutions are all acceptable.  The optimal solution depends on the specifics of each boat.  Just to be clear, the three solutions discussed are (1) adding internal tabbings to the hull deck joint, (2) adding external tabbings, and (3) using machenical fastners (machine screws and nuts, not pop rivits).
 
If I remember it correctly there are at least three A/C owners (Ebb, Tony, and someone else) mentioned that they used internal tabbings in this thread.  I have also chosen this approach.  The advantages of this approach is that it does not have to be faired smoothly and painted perfectly as external tabbing would require.  It just has to be strong.  The disadvantage is that grinding existing tabbing inside a small cabin or cockpit lazarette is a nasty job that no one should have to endure.  And it can only be done after you tear down all of the existing shelvings and cabinetries.
 
I don't remember reading anyone in this thread using the external tabbing approach but Hal Roth famously described his external tabbing experience in his books (obviously he had a different boat).  I also know another east coast Triton owner (Steve Cossman) used external tabbings to strengthen his hull deck joint (I think it was done by a local boatyard - Svendsens in Alameda.)  The advantage of this method is that it is much easier to grind and apply fiberglasss tabbings from the outside.  One point that makes the east coast Tritons easier to apply external tabbings is that the hull deck joint is a butt joint AND the toerail is rounded off on top which makes it a lot easier to fit the biaxial tapes over the contours.  The disadvantage is that it is more demanding to fair and paint the new tabbings since they are external.
 
I only know one Triton owner used mechanical means to fastern his hull deck joint.  That was done on a west coast Triton which has externally turned lips on both hull and deck.  So the owner drilled quarter inch holes and fasterned hull deck joint with machine screws and nuts.  He then capped the whole joint over with a hollow rubbing strake.  The advantage of this method is the machenical means are easier to see and it just feels more solid because you don't have the issue of not knowing how well the new tabbings are bonding to the old fiberglass.  The disadvantage is that you need overlapping hull deck joints to be apply the screws to.  The butt joint common on east coast Triton and A/C are not condusive to this method of fixing.
 
In addition to these three basic solutions some owners have used combination of two approaches.  Ebb's idea of adding internal tabbing and then bolt the new tabbings down to both hull and deck on each side of the joint is a great example.  It wil certainly create an extremely strong joint.  The disadvantage is that it is a lot of work and it will introduce more holes in the hull.  I have also read other people adding additional tabbings internally and externally which would also create a very strong joint.  Again the disadvantage is that it is a lot of work.  I am sure that there are many other potential solutions and combination of these various solutions.  I would be very appreciative if more experienced people can show me other possibilities that are more efficient and easier to apply.
#9
Technical / Deck joint-Who, What and When
December 16, 2013, 10:23:45 PM
Wow, another case of a torn hull deck joint albeit from an accident.  I don't know the details of the fall but can imagine that the force of the impact from the side of the hull deck hitting the water must be similar to the force created from a slamming by a freak wave.  The bottom line is this Renegade hull deck joint was not strong enough to survive the fall.  The natural question is then could any Triton/Arial/Commander/Renegade survive such a fall.  I don't know the answer.  The bottom line for me is that they need to if you intend to take the boat offshore, which is the reason why I am going to process of adding additional tabbings internally to the hull deck joint.  If you are just daysailing or racing around the boyd then all you should care is if the hull deck joint is leaking or not, unless your boatyard drops your boat from the travel lift in that case you might be lucky and get a new boat.
#10
Technical / Deck joint-Who, What and When
December 16, 2013, 10:12:17 PM
Ok, that explains the disappearing posting mystery.  I commend the Forum for its discipline.  At the same time it would be nice to get an explanation or at least a note to the effect.  I literally posted the same postings three or four times thinking that I must have done something wrong in the posting process.
#11
Technical / Deck joint-Who, What and When
December 15, 2013, 11:44:42 PM
LOL... Ebb, that's a good one.  Being an engineer myself I admit us engineers love to solve problems regardless if the problem needs to be solved or not, who will benefit, how the solution will be funded, etc, etc...  I also admit in many ways I approach boat projects the same way - solve problem first, define goal later, if ever.  Sad isn't it?  But you live and you learn.  I am getting better at defining goals first and then finding solutions.
 
I think someone must be eating my postings.  For two days in a row now I have posted new postings and verify that they are posted only to find later in the day they are deleted for some reason.  Maybe they were not posted correctly.  This will be my test posting to see if it will disappear again.
#12
Technical / Deck joint-Who, What and When
December 15, 2013, 01:01:32 AM
Ok, I spent the day cutting out anchor locker bulkhead and removing forward lower shroud chain plate knees. I then started the miserable job of grinding down the thick tabbings of the bulkhead and chain plate knees and sanding down the v-berth and anchor locker as preparation for installing stringers and full length shelves. For those of you who ever wondered what is holding the forward lower shroud chain plates in place here is a picture. Just three size 12 wood screws holding the chain plate to a piece of 2x4 that is considered a kneed - sure is not much.


Well, finally, I have some good news. I mentioned in my posting previously that the tabbing between the anchor locker bulkhead and the under side of the deck was rather easy to pull out. Not the case with the tabbings between the bulkhead and the hull. I had to cut tabbings with cutoff wheel and then chisel where I could not reach with the cutoff wheel. I pulled and pulled and even gave it a couple kicks but it refused to come out. Finally, I had to cut the bulkhead into two pieces to get the upper piece to come out first. Then I hammered and chiseled to get the lower half to detach from the tabbings which were hard to reach. The moral of the story is that I am encouraged by the tenacity of the tabbings. I dicovered that the key difference between the bulkhead tabbing to the deck and the tabbing to the hull is that the former used what appears to be chopped strands and the later used weaved rovings. The difference in bonding quality if HUGE. I am hopful that the hull and deck joints are tabbed with weaved rovings. Nevertheless, I still intend to grind down the hull and deck tabbings and add two more layers of biaxial (1708).
 
As mentioned I intend to move the bulkhead forward approximately 6 inches. Tritons have a huge anchor locker but a small v-berth. I am 6'2" whereas the v-berth is only 6'0" long bulkhead to bulkhead. Moving the anchor locker bulkhead forward 6" should make the v-berth a lot more comfortable. It will also enable me to install a 20 gallon water tank under the forward half of the v-berth.


#13
Technical / A Tangent on West Coast Triton Chain Plates
December 15, 2013, 12:18:40 AM
Well this is weird... I just posted this posting and Ebb apparently responded to it and now poof it is gone. So I am reposting it in reverse chronological order with Ebb's posting above. Just like a flash back in a movie;)
As long as I am moving the anchor locker bulkhead I might as well take advantage of the opportunity to address the forward lower shroud chain plates which are all original. For reasons I don't understand Aero Marine installed the lower shroud chain plates longitudinally, screwed on to the knees which are basically pieces of 2x4's glued to the hull. The main side stays, on the other hand, are installed athwartship and bolted to the main bulkhead.
The knees and the chain plates are then encapsulated in a couple layers of fiberglass. I did not understand the point of the fiberglass until I cut them open. I found out that the chain plates are screwed onto the knees and the knees are glued to the hull but are now partially separately. So the fiberglass that encapsulates the chain plates and knees is actually holding them onto the hull. Here are a couple of pictures of the chain plates, knees and fiberglass shell that I cut out. I plan to rebuild the knees and reinstall the lower shroud chain plates longitudinally like the East Coast Tritons and late model West Coast Tritons.
Additionally, I cut out the original shelves on both side and plan to install full length shelves from main bulkhead to anchor locker bulkhead. I mentioned in my previous post that West Coast Tritons don't have stringers in the v-berth for some reason. In addition to providing more storage space the full length shelves will also stiffen the hull.

 
#14
Technical / A Tangent on West Coast Triton Chain Plates
December 14, 2013, 12:44:14 PM
As long as I am moving the anchor locker bulkhead I might as well take advantage of the opportunity to address the chain plates which are all original. For reasons I don’t understand West Coast Triton lower shroud chain plates are installed longitudinally and are screwed on to the knees which are basically pieces of 2x4’s glued to the hull. The main side stays, on the other hand, are installed athwartship and are bolted on to the main bulkhead.
 
The knees and the chain plates are then encapsulated in a couple layers of fiberglass. I did not understand the point of the fiberglass until I cut them open. I found out that the knees are now partially separately from the hull. So the fiberglass that encapsulates the chain plates and knees are actually holding them onto the hull. Here are a couple of pictures of the chain plates, knees and fiberglass shell that I cut out. I plan to rebuild the knees and reinstall the lower shroud chain platess longitudinally like the East Coast Tritons and late model West Coast Tritons.
 
I also cut out the original shelves in the v-berth and plan to install full length shelves from main bulkhead to anchor locker bulkhead. I mentioned in my previous post that West Coast Tritons don’t have stringers in the v-berth for some reason. In addition to providing more storage space the full length shelves will also stiffen the hull.
#15
Technical / A Tangent on West Coast Triton Chain Plates
December 14, 2013, 01:10:38 AM
As long as I am moving the anchor locker bulkhead I might as well take advantage of the opportunity to address the chain plates which are all original. For reasons I don't understand West Coast Triton lower shroud chain plates are installed longitudinally and are screwed on to the knees which are basically pieces of 2x4's glued to the hull. The main side stays, on the other hand, are installed athwartship and are bolted on to the main bulkhead.
 
 
The knees and the chain plates are then encapsulated in a couple layers of fiberglass. I did not understand the point of the fiberglass until I cut them open. I found out that the knees are now partially separately from the hull. So the fiberglass that encapsulates the chain plates and knees are actually holding them onto the hull. Here are a couple of pictures of the chain plates, knees and fiberglass shell that I cut out. I plan to rebuild the knees and reinstall the lower shroud chain platess longitudinally like the East Coast Tritons and late model West Coast Tritons.


I also cut out the original shelves in the v-berth and plan to install full length shelves from main bulkhead to anchor locker bulkhead. I mentioned in my previous post that West Coast Tritons don't have stringers in the v-berth for some reason. In addition to providing more storage space the full length shelves will also stiffen the hull.